
Anatomy of a TableView(Controller) Architecture
UITableViews are part of our projects since the very beginning of the iOS SDK. But even if they are kind of our “old friends”, many of us still don’t use them properly. No, wait. I know you use them to “show cells”, of course. For “properly” I mean: in a well architected way.
The most diffused “wrong” approach
When developers need to use a UITableView, they put it normally in a UIViewController, or UITableViewController. At this point the first thing they do in the ViewController is:
1 2 | |
setting the class conform to these two protocols.
Not really a big deal.
Let’s discuss some better ways to structure our code.
First of all we have to understand the difference between UITableViewDelegate and UITableViewDataSource or in a more general sense, the difference between delegate and datasource;
Secondly we should reflect about what a ViewController should take care of.
Understanding the roles
In order to have a clear vision of how to build a strong architecture, we first have to understand what is a delegate, and what is a datasource.
Delegation is a pattern used to send a message from an object (the delegating), to another object (the delegate), and as Apple says:
The message informs the delegate of an event that the delegating object is about to handle or has just handled.
So in the UITableView’s case, its delegate is called when an user taps a cell, or adds/deletes/moves it, etc.
The datasource is the object responsible for managing the content you are presenting for example in a table or collection view. His main task is to return the data which will be displayed by the table view.
So we can imagine the table view asking to his datasource questions like:
- How many sections shall I have?
- For a given section, how many rows shall I display for it?
- For a given section, what title shall I display for it?
and so on…
Now the question (and also one of the main point of this text) is:
should the ViewController be responsible of all this being both, tableView’s delegate and datasource as well as, I repeat, the view controller?
What the view controller should effectly take care of?
Since the initial Apple tutorials back to 2008, developers took the habit to put everything into the view controller, bringing the whole tech community to joke about this buckling the famous pattern and acronym MVC, the meaning of “Massive View Controller” instead of “Model View Controller”.
So the answer to the previous question as maybe you can imagine is a most likely NO.
The ViewController, should indeed be responsible to interact with other entities as for example the network layer or the data model, providing then the data to the view (or to the ViewModel as in the MVVM design pattern). Moreover, it should handle the final actions performed from the user on the view.
In the UITableView’s case, is the TableView’s delegate to handle the actions performed on the table, following for example this process:
- 1 - An user taps a cell;
- 2 - The table view delegate handles the tap;
- 3 - The delegate does something and if needed it will call the final action in the view controller.
Don’t worry about the third point, we’ll see how to sort it out shortly.
Building the architecture
After this (too) long introduction, it’s time to discover the core of this article: how to build an efficient architecture.
The standard architecture we have when we create a UIViewController with inside a UITableView, is basically the following:
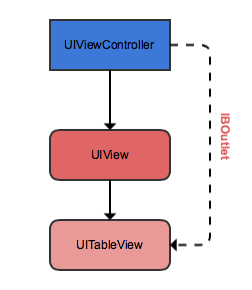
Well, a simple view controller with his view, and an IBOutlet to the UITableView (or a reference in code, but let’s take is simple).
The next step, would be to understand how and where we want to istantiate the delegate and the datasource. This is absolutely the main point of our architecture, as we want a net separation between these objects, so that everyone has its own responsabilities. Therefore what we need is a custom delegate, and a custom datasource. These will be respectively conform to UITableViewDelegate and UITableViewDatasource:
1 2 3 4 5 6 7 8 9 | |
But who should instantiate and own these 2?
The answer may vary, but having them into the ViewController is totally acceptable and we are going for taking this choice.
As controller of the view and principal “manager”, it will own and set them as delegate and datasource of our UITableView:
1 2 3 4 5 | |
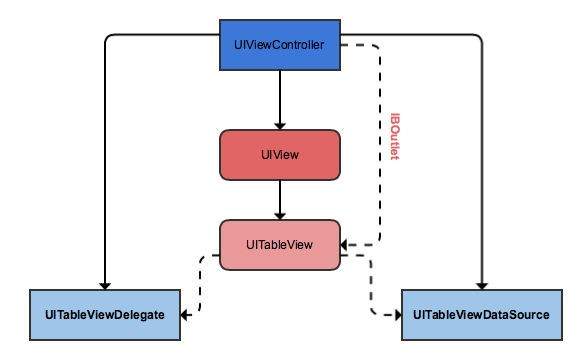
Therefore, at this point our architecture should look like this:
Let’s also suppose to have a custom headerView for the UITableView:
1 2 3 | |
as well as some cell to display:
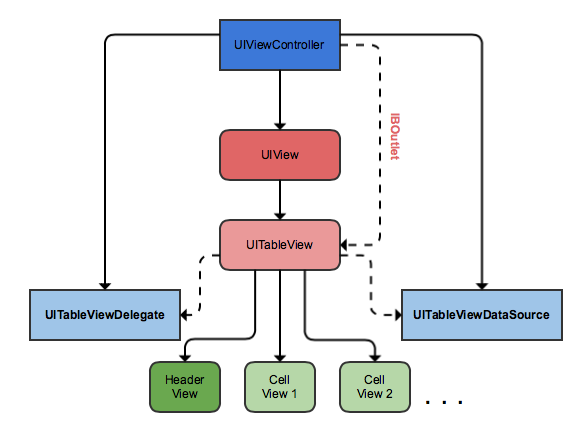
Good.
The architecture begins to take shape. We have almost all the pieces.
We know that the delegate will take care of the tableView’s events, but how will the datasource generate the data for the tableView?
The datasource has to generate the necessary data using the available information. Sharing this information, is ViewController’s. Indeed, it could pass the reference to this data at the moment of the datasource initialization.
So let’s go back some lines and let’s refactor our code, supposing that the data we want to pass to the datasource is a user data object:
1 2 3 4 5 | |
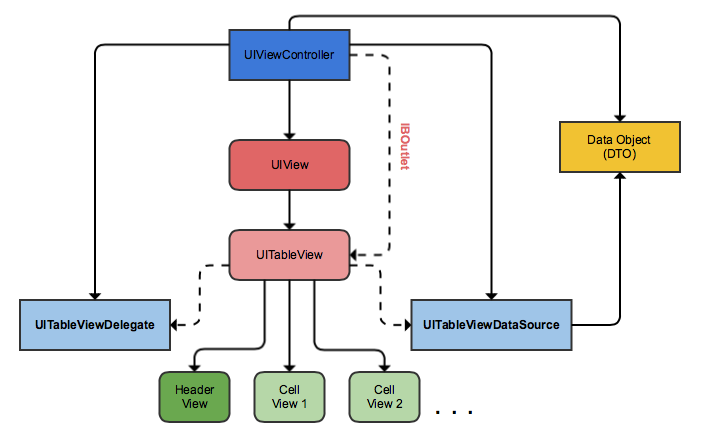
Cool. So let’s have a look at the final architecture:
Now the datasource can use this data to generate and return cells for the TableView throught the method - tableView:cellForRowAtIndexPath: called from the latter.
The user DTO object contains common info like:
- name;
- surname;
- gender;
- birthday;
- address;
and so on.
As we said above, the responsibility of the datasource is to manipulate these information displaying them into the appropriate cells.
But which is the best approach to achieve this result?
In one of my previous articles, I wrote about Interaction Objects.
An InteractionObject is a component which can store all the information needed to configure a cell, i.e.:
- image;
- title;
- value;
- target;
- selector;
..etc.
An example of InteractionObject, is something like this:
1 2 3 4 5 6 7 | |
(as you see, the target is a ViewController, which in this case could be passed for example during the datasource’s initialization, using a weak reference).
Once that the datasource has configured these objects, it will store them into an hierarchy of arrays, ready to be showed in the right indexPath:
1 2 3 4 5 6 7 8 | |
Here is the image rapresenting the final architecture:
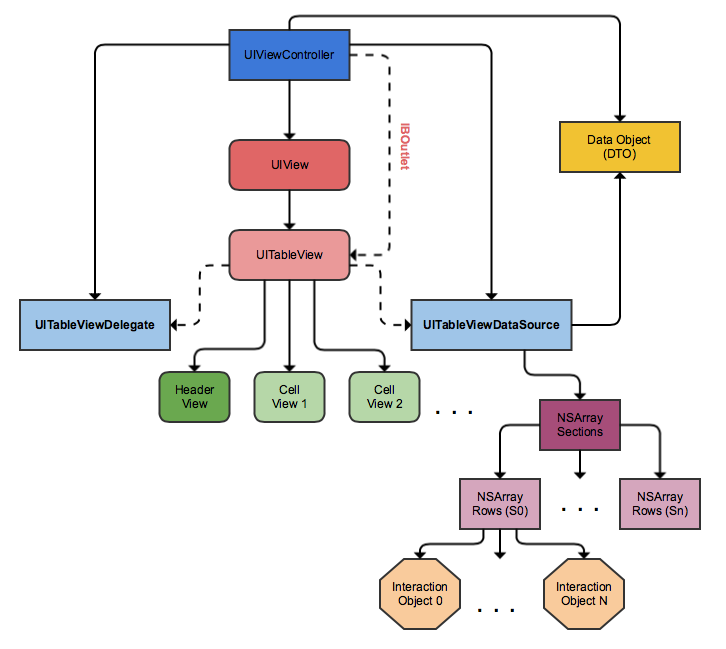
Finally, as we want to be able to update our InteractionObjects as well as reloading the headerView and cells, we have to override the method - reloadData of the UITableView, subclassing the latter:
1 2 3 4 5 6 7 8 9 10 11 12 13 14 15 16 17 18 19 20 21 22 23 | |
When this method is called, firstly is called [datasoure updateData], which reading from the data object (in our previous example, the user), regenerate all the InteractionObjects, included the one for the headerView.
Well, let’s recap a little bit:
- 1 - the ViewController creates the
UITableView’s delegate and datasource as separated components; - 2 - the method
- reloadDatais called on the TableView; - 3 - from the previous point, the datasource gets updated creating all the needed InteractionObjects by the information contained in the DataObject;
- 4 - calling
[super reloadData]the method- tableView:cellForRowAtIndexPath:gets invoked from the TableView, and the cells are configured passing to anyone the corresponding InteractionObject; - 5 - the headerView is updated.
The last thing I would like to stress, is the simplicity of the method which should handle a tap on a cell:
1 2 3 4 5 6 7 8 9 10 11 12 13 14 15 16 | |
which the only thing it does, is getting the corresponding InteractionObject for that indexPath, reading the contained information to perform then a selector on a target.
Conclusion
Following the architecture explained in this article, your project folder hierarchy should look something like this:
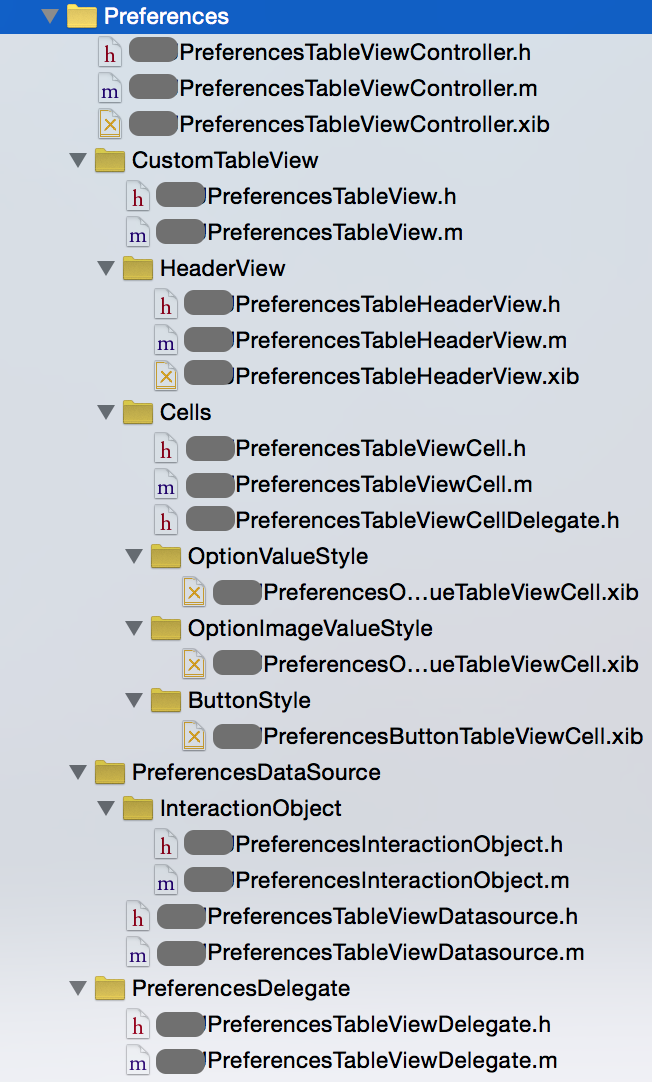
The best thing of this approach, is the architecture really scalable and maintanable. Even if after some months you’ll need to add another cell in one of the TableView’s section, the only thing you’ll do will be creating another InteractionObject, letting every component doing its job and without touching any kind of method.
Thanks to Alberto De Bortoli for the review of this article.
Follow me on Twitter!
Enjoy ;)
Cheers!