
Branching Model and CI Configuration @ Busuu
Any tech company which has a team of developers working on a project, needs to have a repository and to use a revision control system, as for instance Git.
Unfortunately, even though the choice of platforms/tools seems to be pretty standard for most development teams, many companies and particularly many teams, still don’t use a strong Branching Model and a powerful Continuos Integration configuration.
This article wants just to show how we sorted these important things in busuu, giving an idea of what we think is nicely organized.
GitFlow as branching model
Working in a project, always comes the time to pick a story from the board (possibly working on that without breaking the stable version of the project) and always comes the time to merge something in the main branch, testing, releasing, distributing, fixing a bug and so on.
All these operations may easily generate a problem or break something if they are not dealt carefully. What I think is foundamental to reach this goal, is to use a consistent branching model.
In busuu, we use Github as repository manager, JIRA as issues and project tracker, Git as revision control system, and we all together decided also to use GitFlow as branching model.
Probably you may have read in the past the article “A successful Git branching model” of Vincent Driessen, talking exactly about GitFlow. If not, don’t worry. I’m gonna expose just below the same main image used in that article to explain how GitFlow works:
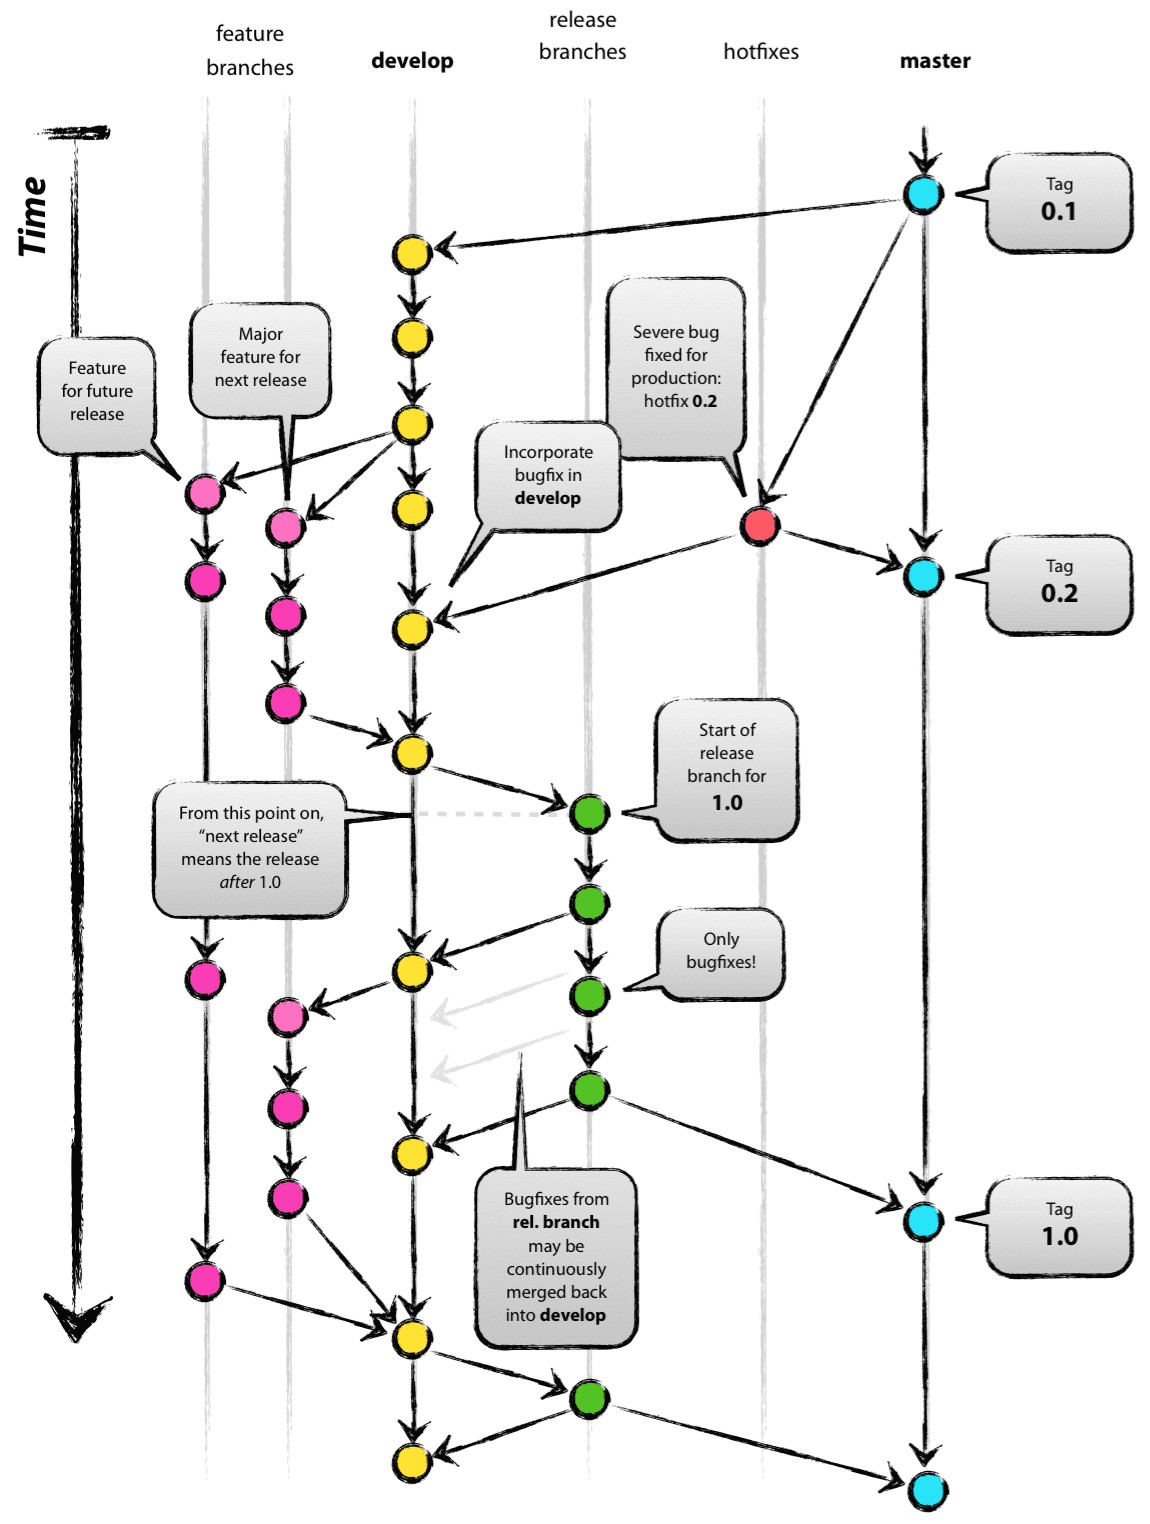
When I saw this image, I found it very explicative. Let’s see it together:
Firstly we see two branches in bold: develop and master. These branches are the most important, and they will never be removed or renamed.
develop is the branch containing the project’s version on which we are currently working on. Every node of this branch should be always release ready (i.e. we should be able to create a release from it). This means that it will never contains just a part of a feature or a broken piece of code, but it will instead ever contains completed features or fixes.
master is the branch containing the project’s version which is currently in production (i.e. AppStore, Google Play, etc.). Every node of this branch should match with an actual release in production.
Cool, the main branches have been quickly explained.
What is clear from the picture is that there are other branches around these two, and they are what I call “temporary branches”. I’m gonna explain what these are, showing step by step how GitFlow works and how should we apply it:
STEP 1
Initial phase
In the initial phase of a project we should just have the main branches just explained above: develop and master.
STEP 2
First feature
Now is the time to choose a story from our issue/project tracker (i.e. JIRA) and working on that. Let’s say that we choose the story IOS-941, bringing this from the To Do to the In Progress column.
What we should do now, would be to create a separated branch.
Indeed, working on develop is not a good practice, especially if we are working with a team. The risk to have conflicts breaking the project could be really high and will be also hard to keep cleaned the project’s history. Also remember that, for definition develop should be in any point deliverable. This means that a branch should be merged on develop just when the related feauture is completed and it is ready to be shipped. Instead, pushing everything there would imply to have in many points of the branch, small parts of different stories, all together at the same time. In other words: an uncontrollable big mess.
So as I said above, we have to create another branch starting from develop. The new banch should be created in the subfolder feature as we are, indeed, implementing a new feature: feature/IOS-941.
STEP 3
The feature is complete
After having finished our feature, of course we would like to close it and merge it into the develop branch.
That’s the time to ask a Pull Request.
A Pull Request, is a request made to the devs team, in order to let them review and eventually approve our code, merging it on develop.
The process we follow in busuu in this situation, is to pick up the story in JIRA, moving it in the Review column. Then, when a team’s developer notes a story in review, he should have a look at the code being sure that everything is ok, and then he should moves the story in the Testing column.
Now the ball goes in the QA’s hands. The QA (often called Tester), should test the new feature, moving the story in the column Done if everything is ok, or otherwise back In Progress reporting the issue.
Supposing that our feature has been approved even by the QA, any member of the dev team could now merge the pull request in develop.
STEP 4
Prepare a release
When all the features we want to be in the next version of the app are completed and merged in develop, it is the time to create a release. So what we should do is to create a branch from develop in the subfolder release, ideally naming the branch with something related to the version number, like for instance release/v1.0.
What we have now in this release branch is what we want to be published to production. Of course, we want to make sure that all the features have been integrated together without breaking each other. This is the point in which the QA performs the regression testing.
Any bug found should be fixed directly in this branch, and then merged in develop to keep the working branch updated and stable.
Please note that only bug fixes are allowed in this branch, and only develop should be updated if this branch gets bug fixing commits.
STEP 5
Let’s go in production!
Once we properly tested and fixed eventually bugs on the release branch, it comes the time to submit the app in the store.
What we should do now, would be to merge our release/v1.0 in master, therefore finally closing this release branch.
Everytime something is merged on master, we should create a new tag related to that published version of the app. This makes easy also navigating in the versions history in the repository.
When a release goes in master, we can finally delete feature/* and release/* branches related to this, keeping our repository clean and tidy.
STEP 6 - Optional ;)
Bug: please fix immediately!
Yes, it may happen.
Just suppose that while our app is in production, a serious bug is tracked on Crashlytics (or similar). What we want to do, is to fix it immediately and to distribute another version of our app. This is what is commonly called a hotfix.
In the initial image, you see an example of hotfix. As you can note, a branch is created directly from master, and after having fixed the issue, the branch is merged back, again, directly on master but also on develop, to continue to keep it safe. As we said in the previous step, merging on master a new tag is created and a new version of the app gets submitted to Apple.
The branch should be created under the subfolder hotfix, i.e. hotfix/IOS-950.
This is “briefly” how GitFlow works.
SourceTree as GIT client
Every developer has probably used in life git from a terminal/shell, but what my colleagues and I (but also some other friends of mine) experienced, is that a git client could be really interesting to use as it could result more immediate and easy to use. What we are gonna discuss in this paragraph is how to set up and how to use the client Atlassian SourceTree, respecting the GitFlow approach.
Let’s go fast and easy:
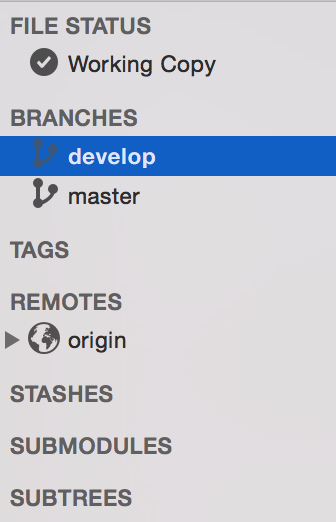
The initial situation we should see in SourceTree after having branched develop from master in our repository, should be this:
On the top bar, close to the end, we can note the button GitFlow:

Pressing this button we’ll access to the GitFlow configuration form:
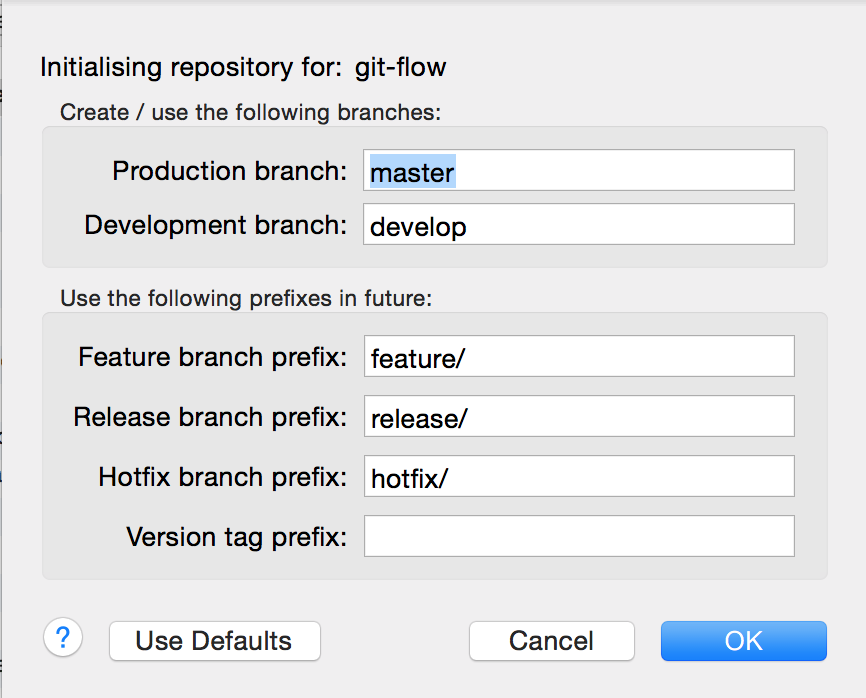
here we could customize the branches’ names and folders, or just keep the dafault configuration (strongly suggested). SourceTree will use these information to create feature, hotfix and release branches, managing them properly. Clicking OK, SourceTree will be ready to use GitFlow.
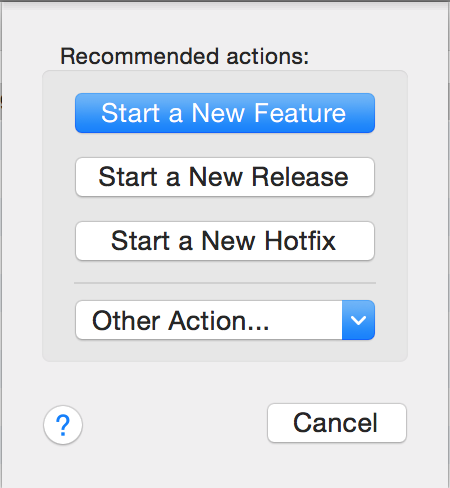
Now it is the moment to create the first feature; so let’s take again for instance the feature IOS-941. The only thing we need to do, it is to click again on the GitFlow button and start a new feature choosing a name for our new branch:
We can do the same also with an hotfix, let’s say IOS-950.
So the branches situation in the left panel would look like this:
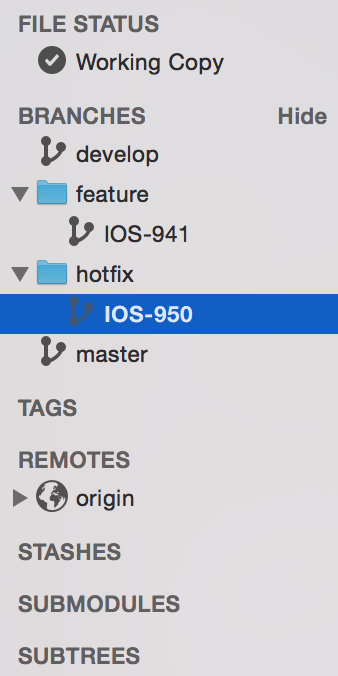
As you see, SourceTree has created for us the right subfolders.
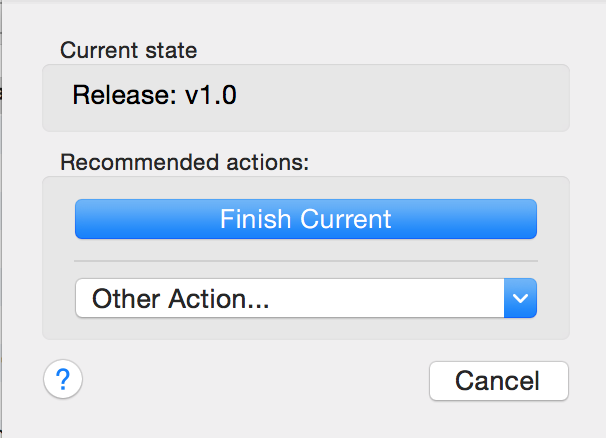
Well, let’s suppose to have fixed our bug and of course we want to release a new version. We need just to click again on the GitFlow button, and we’ll see the following window:
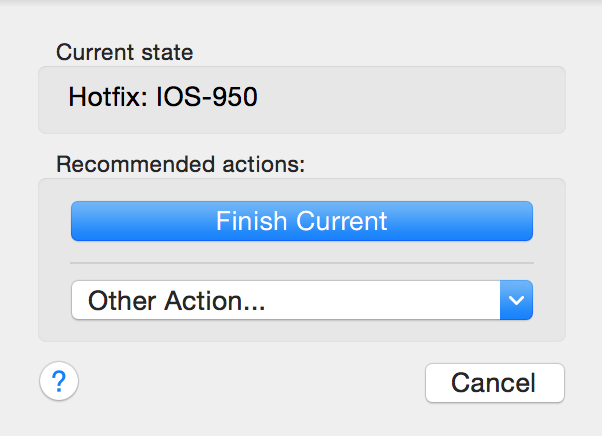
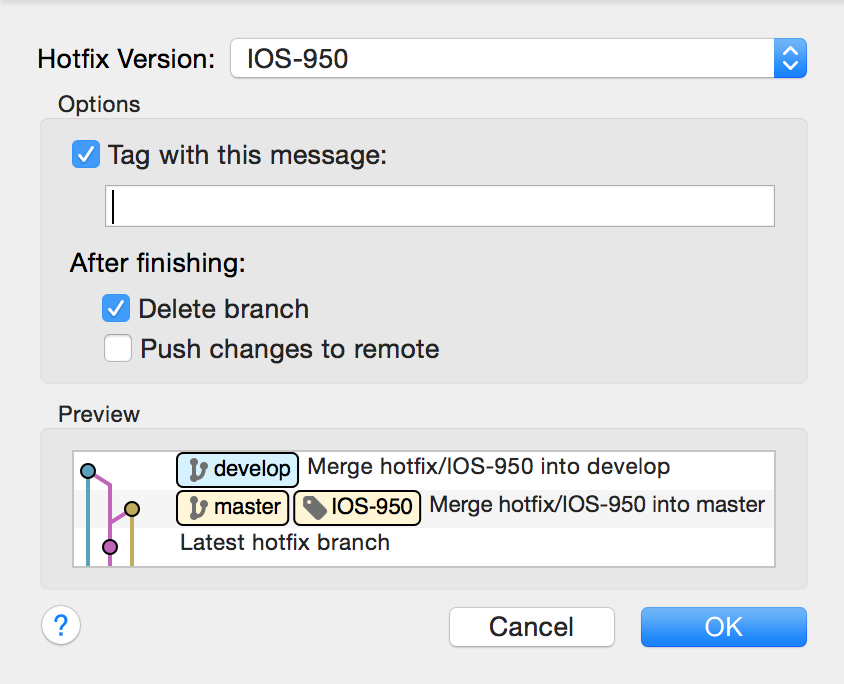
Clicking on the Finish Current button, SourceTree will be ready to merge automatically our hotfix branch in develop and in master, offering us the chance to choose a Tag which will identify the new app version:
Simple as that!
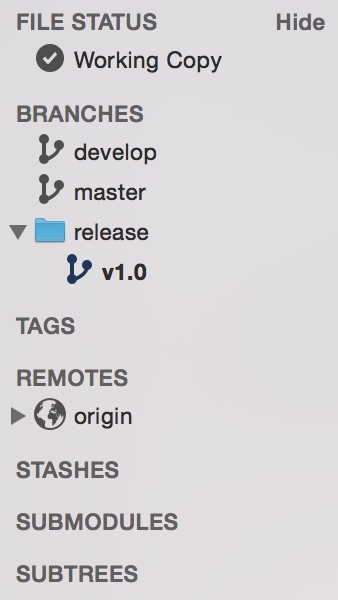
Now let’s see how it works when we have to create a new release.
The process is pretty the same of the previous ones but instead of starting a new feature or a new hotfix, we will start with a new release. After having chosen a name (i.e. v1.0), the result on the left panel will be this:
As we said in the previous paragraph, what we have to do now is to test our new release, normally by QAs and Beta Testers. Any bug will be solved directly in this branch and merged back in develop to keep it updated.
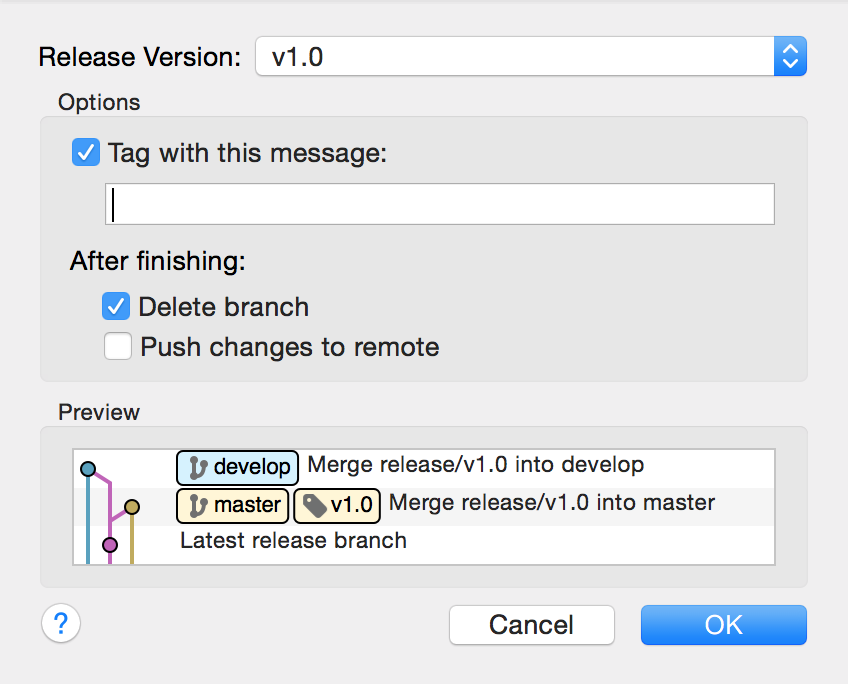
Once we’ll be ready to publish our version, we’ll have to click again on the GitFlow button and “finishing” the release branch:
As for the hotfix, this release will be merged in develop and in master, offering to us the chance to choose a Tag which will identify the new app version:
CI configuration in Jenkins
As you know, as Software Engineers we have to write code, but also to build, test, track and distribute our software. Any of us developers knows how boring it is to perform these tasks manually, as well as how long it takes. For these and other reasons is really recommended for any company to use a Continuos Integration Server.
Today there are many web platform offering this service like, one of the most famous, Travis. But what we ended up to do in busuu is to configure our CI Server in local, installing Jenkins (a really famous CI platform) on a server in our office.
But I don’t want to bore you guys by explaining how to configure Jenkins. It’is enough to read the documentation and play with it. What instead I would like to share are the jobs we decided to set up on Jenkins in order to have a strong automation process:
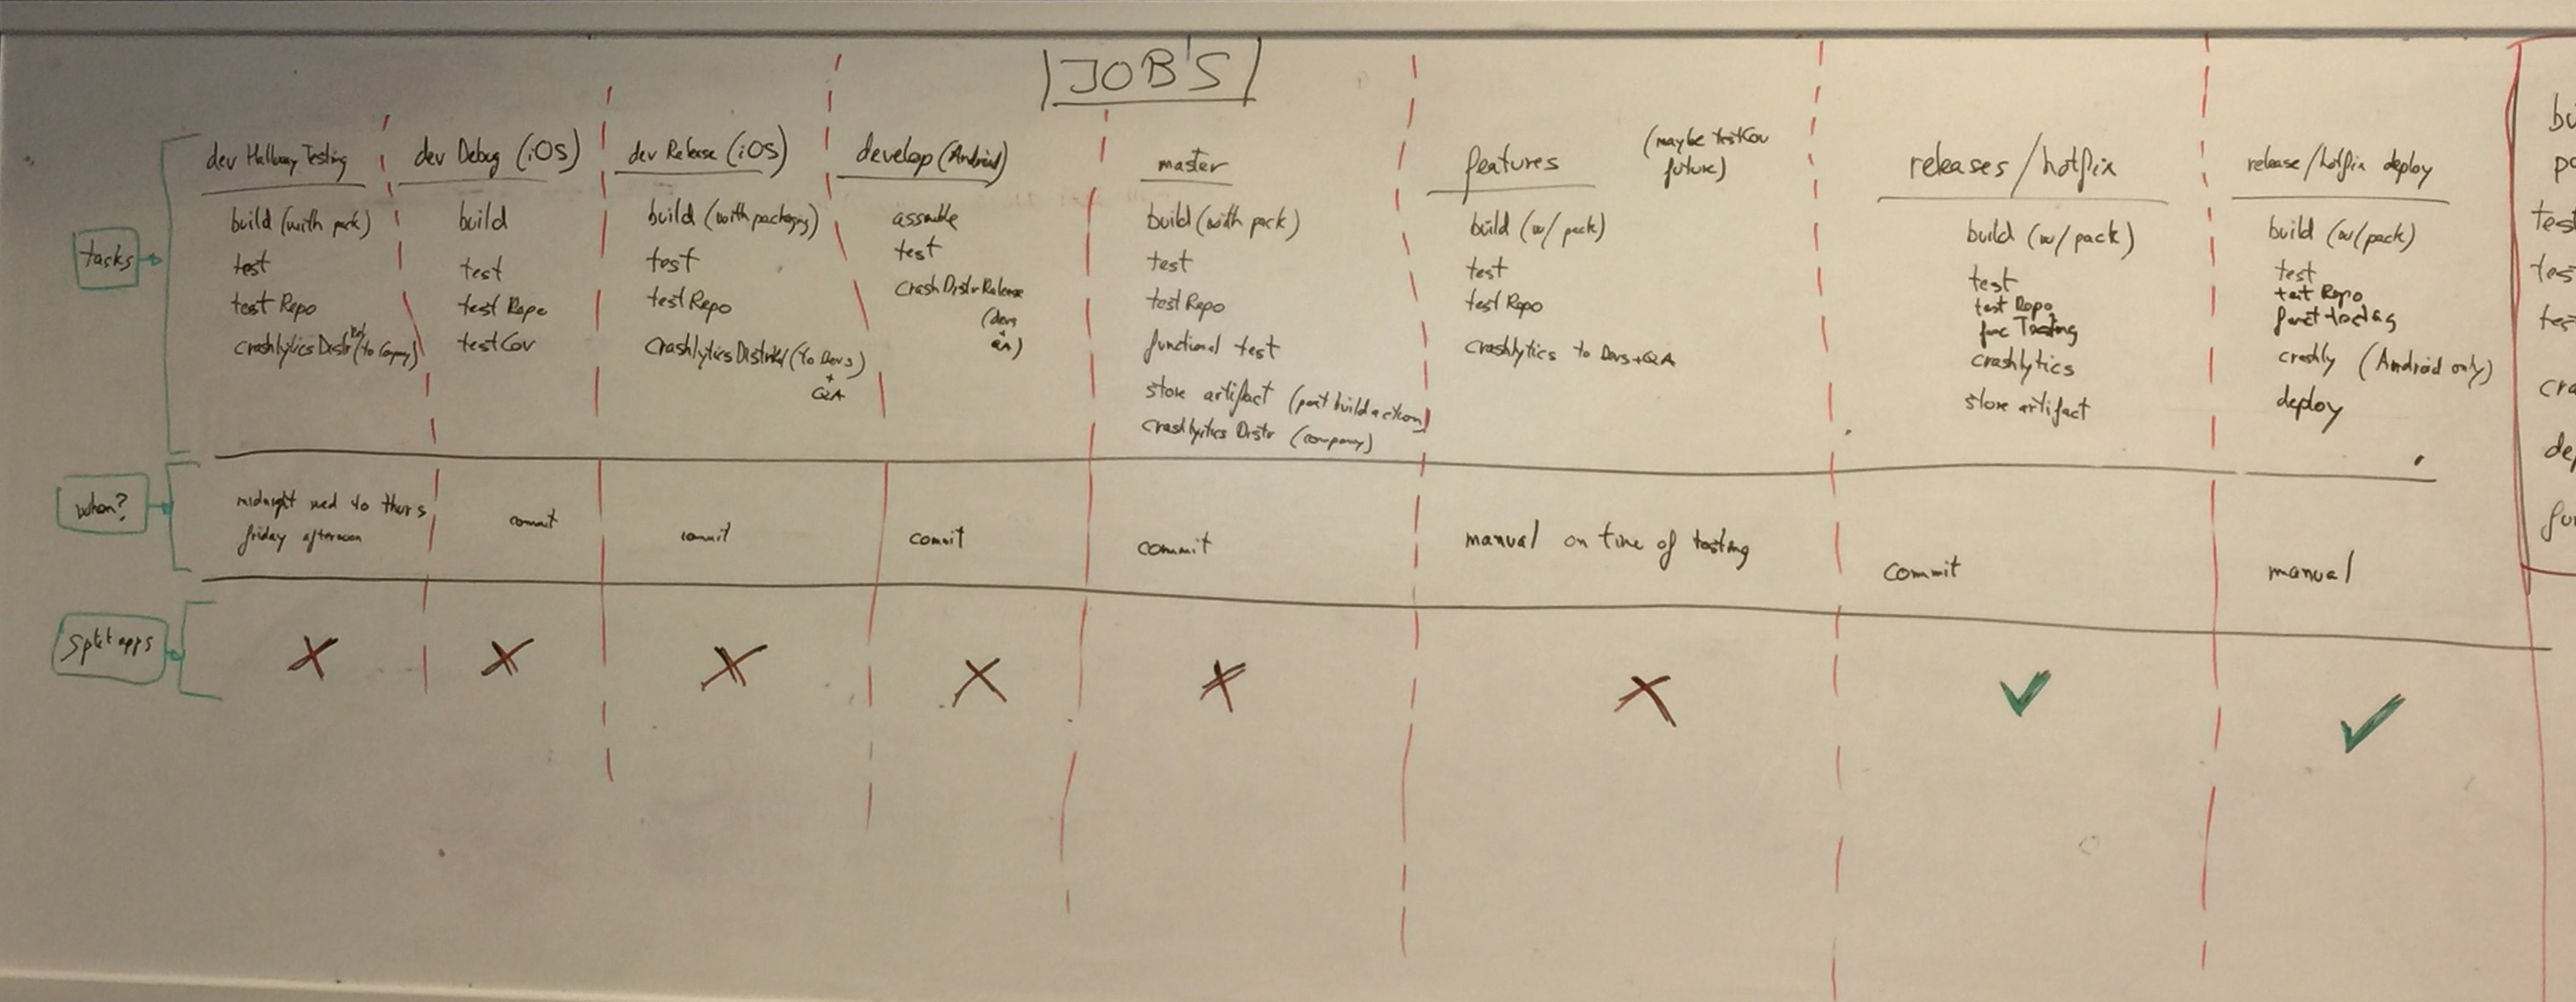
This image is ugly but real 😁. Those are the jobs we decided to set up in Jenkins after a 1 hour meeting.
First of all we identified all the important tasks we would have had need. Let’s explain them together:
- build(+packaging): compiling all of the source files to object files, linking these together into an executable (i.e. in iOS
.app); - unit tests: automated pieces of code used to checks assumptions about the behaviors of our code;
- tests report: unit tests results;
- tests coverage: how much the code is covered by tests;
- functional tests: testing the software’s functionalities (as a human) on a simulator or on a real device;
- beta distribution: distribute the app internally for beta testing (we use Crashlytics);
- store artificat: an artificat can be used to represent data created as a side-effect of running a Jenkins build;
- archive: it generates an archive (i.e.
.ipafor iOS /.apkfor Android) ready to be sent in the market; - assembling: in Android it roughly corresponds to build, package and archive.
From these we created all the necessaries jobs I’m gonna list just below. Just to be clear: in the image you could see some job in more as there could be some difference between iOS and Android:
Job 1
Weekend internal distribution
Branch: develop;
Configuration: Ad Hoc;
Tasks: build > unit tests > tests report > archive > beta distribution (to devs, QA and to the whole company);
When: friday afternoon.
Job 2
Debug for test coverage
Branch: develop;
Configuration: Debug;
Tasks: build > unit tests > tests report > test coverage;
When: on commit.
Job 3
Internal distribution for devs and QA
Branch: develop;
Configuration: Ad Hoc;
Tasks: build > unit tests > tests report > archive > beta distribution (to devs and QA);
When: on commit.
Job 4
Feature branches - Internal distribution for devs and QA
Branch: feature/*;
Configuration: Ad Hoc;
Tasks: build > unit tests > tests report > archive > beta distribution (to devs and QA);
When: manual (when needed to test).
Job 5
Release - Internal distribution
Branch: release/*;
Configuration: Ad Hoc;
Tasks: build > unit tests > tests report > functional tests > archive > store artificat > beta distribution (to devs, QA and to the whole company);
When: on commit.
Job 6
Hotfix - Internal distribution
Branch: hotfix/*;
Configuration: Ad Hoc;
Tasks: build > unit tests > tests report > functional tests > archive > store artificat > beta distribution (to devs, QA and to the whole company);
When: on commit.
Job 7
Released app internal distribution
Branch: master;
Configuration: Ad Hoc;
Tasks: build > unit tests > tests report > functional tests > archive > store artificat > beta distribution (to devs, QA and to the whole company);
When: on commit.
Conclusion
The more processes will be automated and conistent, the more you and your team will save time having your life easier.
Thanks to Christian Garcia for the review of this article.
Follow me on Twitter!
Enjoy ;)
Note: This article has been reported also in the busuu’s blog.